
Columbine Appliqué Crochet Pattern
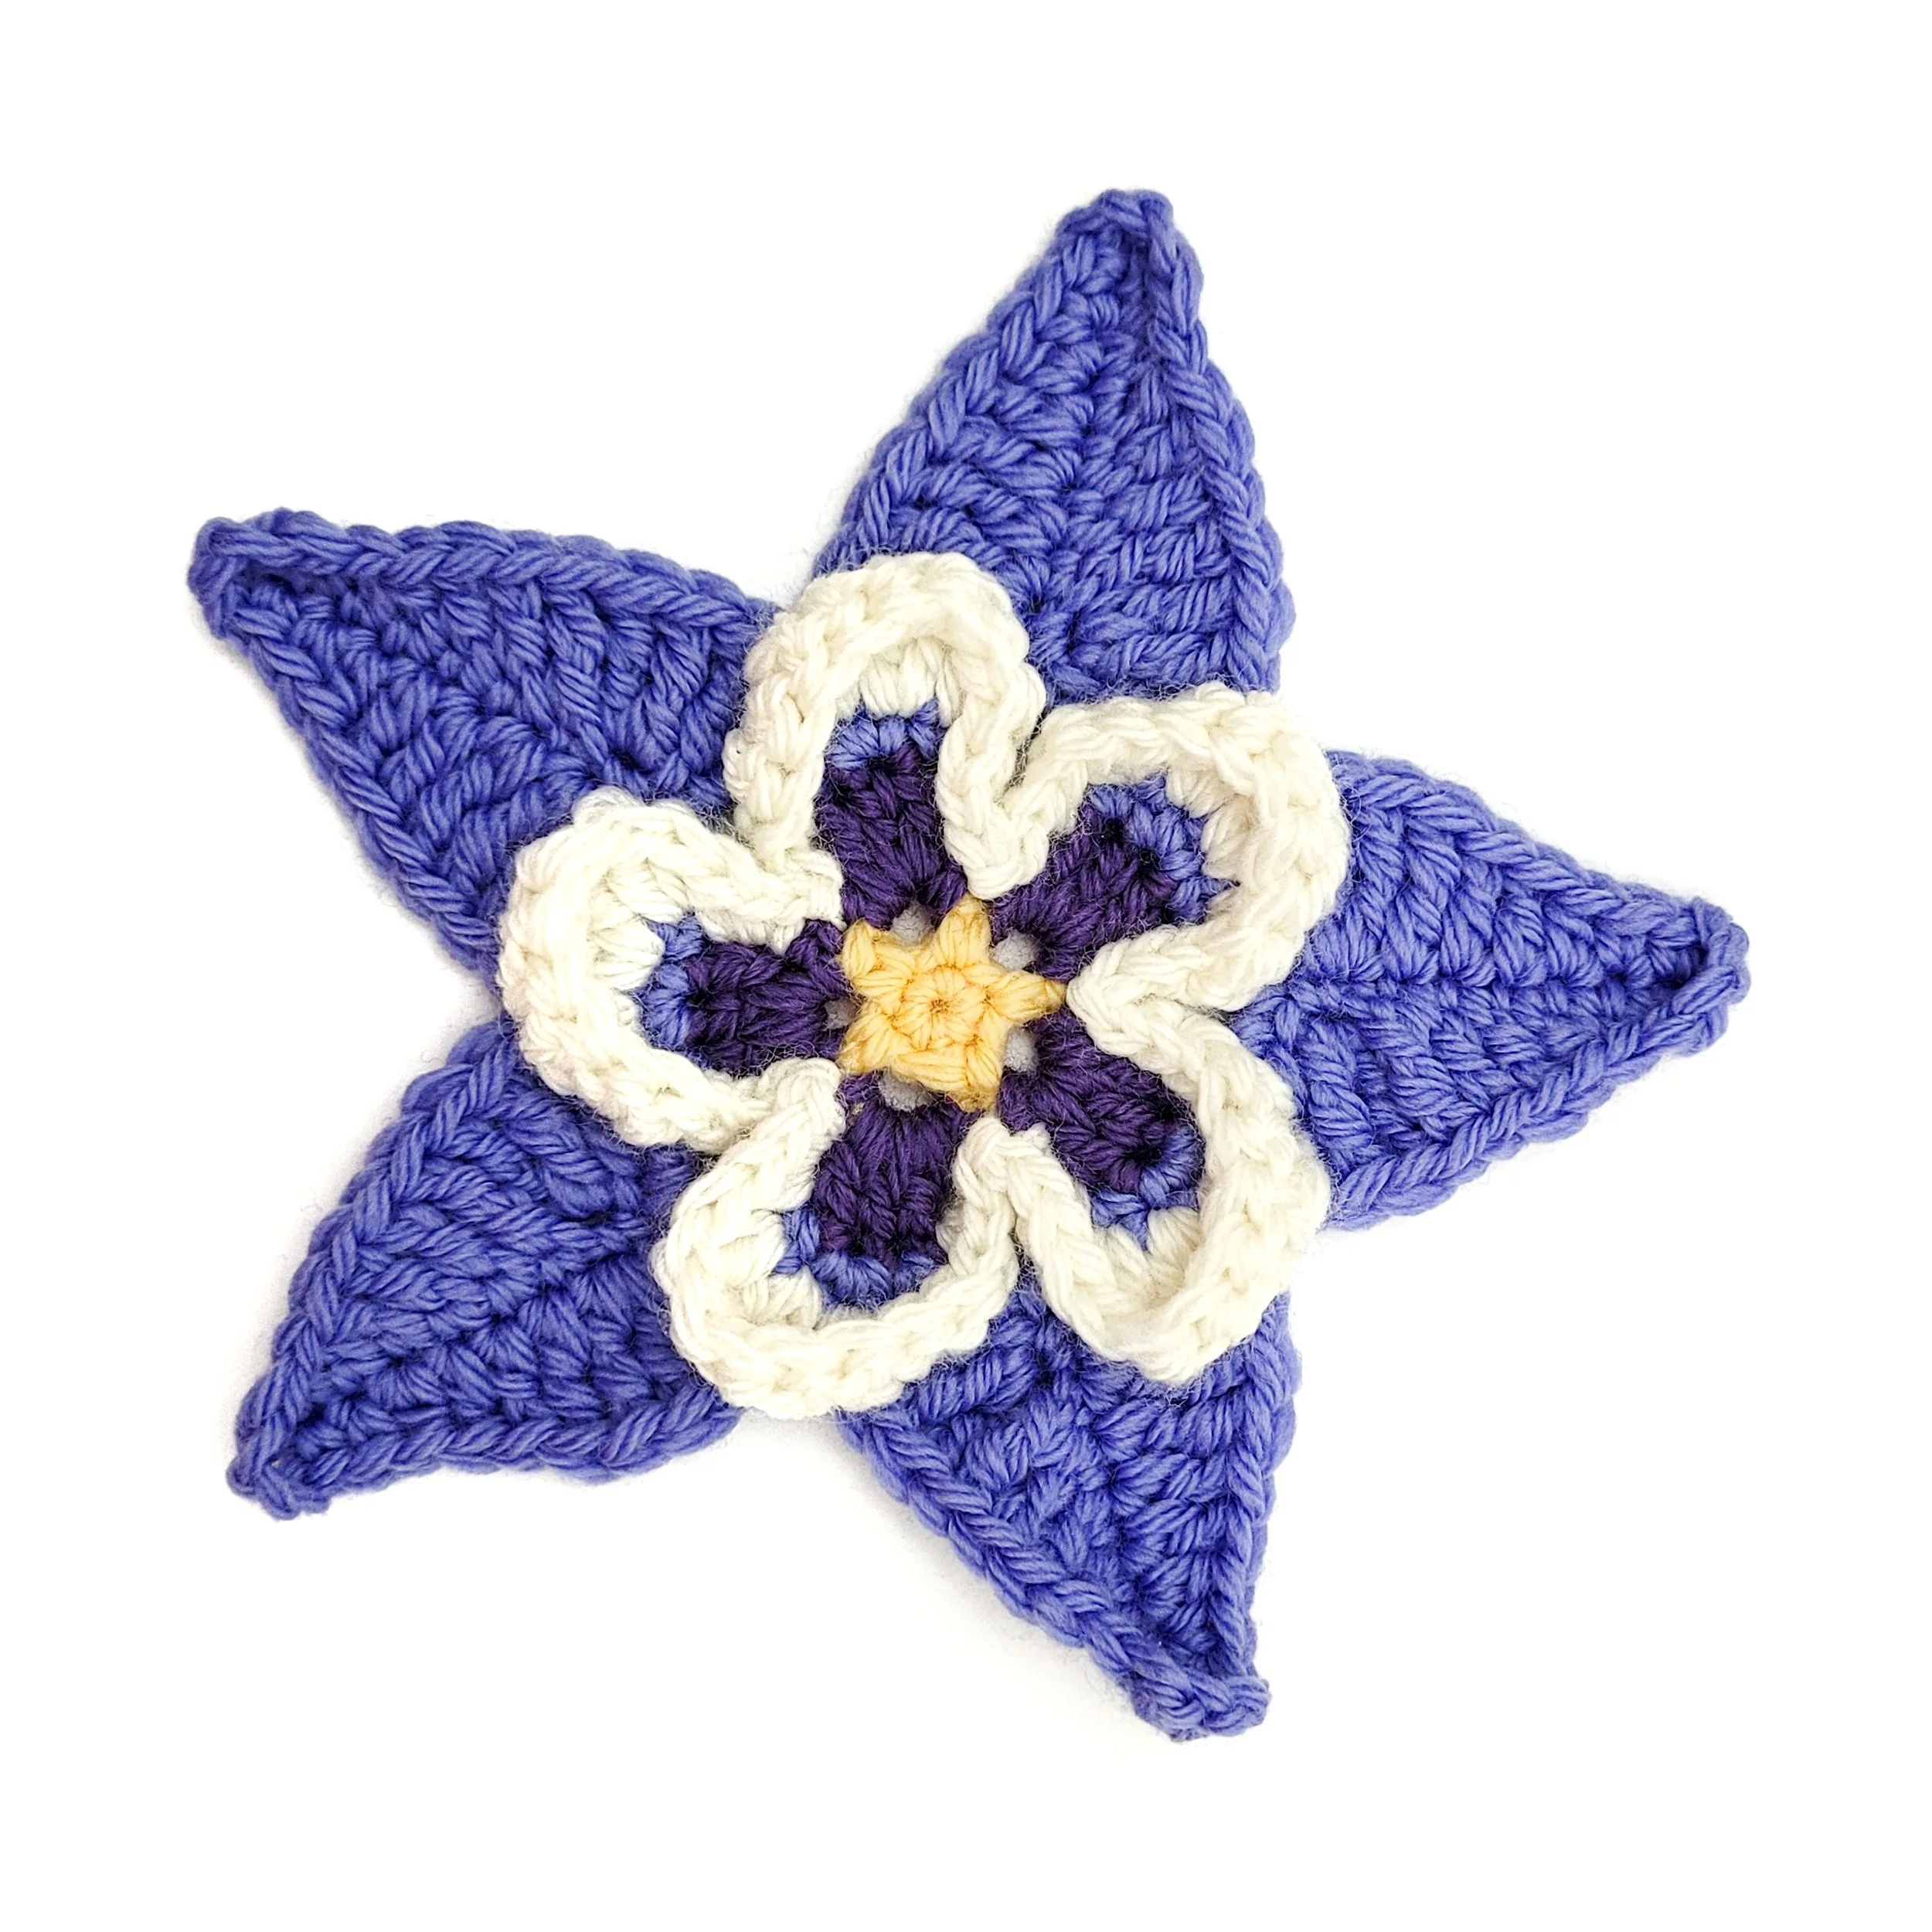
Jump to the pattern!
Crochet the Columbine Appliqué with this free crochet pattern inspired by the distinctive blooms of the Colorado blue columbine, a beloved wildflower of the Rocky Mountains. This dimensional floral design begins with a small, four-color flower and gradually transforms into a striking five-petaled bloom as the layered outer petals are added. Designed for intermediate-level crocheters who enjoy detailed stitch work and adventurous beginners looking to build new skills, this round-by-round pattern includes a variety of techniques, color changes, and dimensional details to create a flower with plenty of depth and character.
The Columbine is the third pattern in my Wildflower Series. To learn more about this project, check out the Crochet Wildflower Field Guide.
What You’ll Love About This Columbine Appliqué
The fascinating transformation of a small, multicolored flower into a large, five-petaled wildflower
A fun skill-building project featuring standing stitches, invisible joins, stitches of varying heights, and other crochet techniques
Perfect for intermediate-level crocheters or advanced beginners looking to expand their skills
Works beautifully in a variety of yarn fibers and color palettes. The possibilities go far beyond traditional columbine colors
What Is a Columbine?
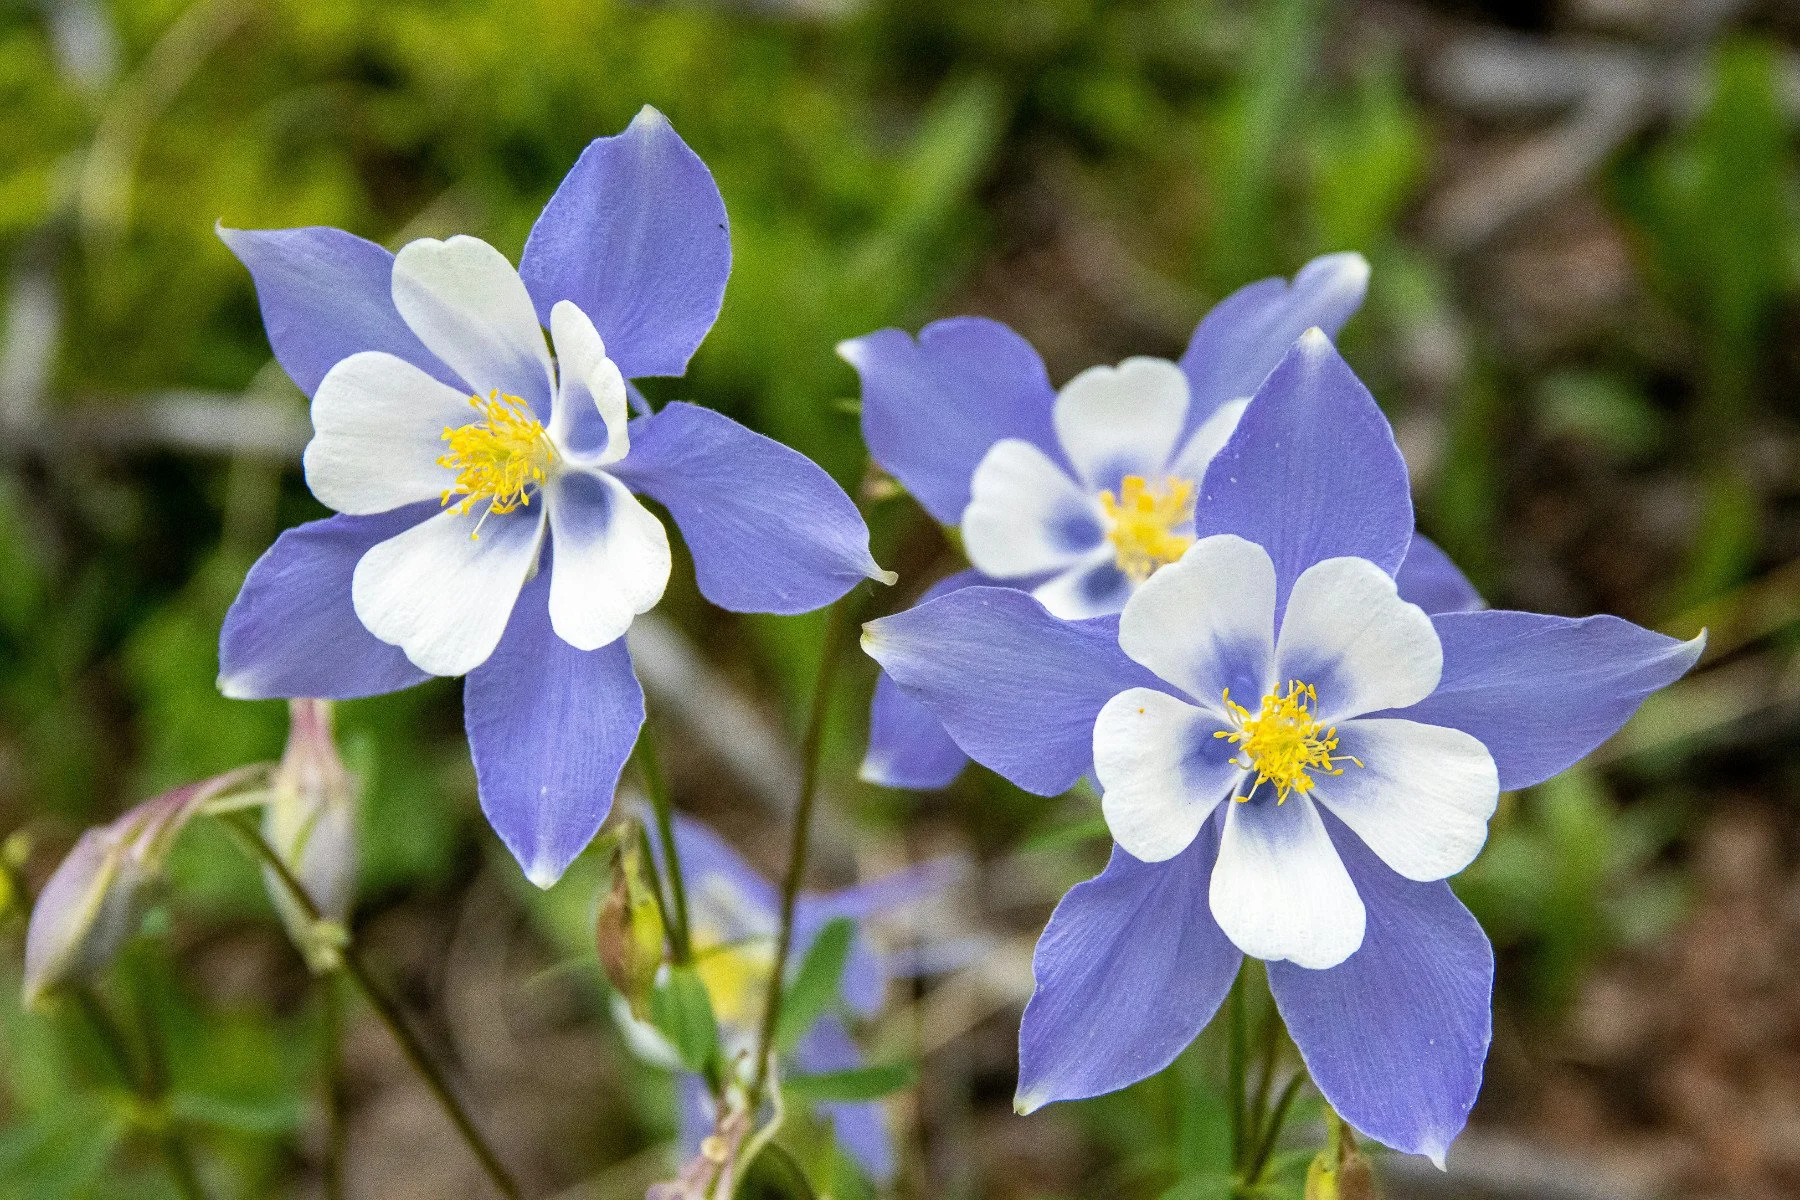
Photo courtesy of Caleb Jack on Unsplash
The Colorado blue columbine is a striking wildflower native to the Rocky Mountains, where it thrives in mountain meadows, aspen groves, and forest edges at higher elevations. These distinctive flowers feature rounded outer sepals, elegant inner petals, and graceful spurs, giving the bloom its unmistakable shape. Blue-green foliage adds to the plant’s airy, delicate appearance.
Columbine flowers are an important source of nectar for hummingbirds and other long-tongued pollinators, including hawkmoths. Their unusual shape and exquisite combination of color and form have made columbines beloved garden and wildflower plants alike.
Ways to Use the Columbine Appliqué
This crochet flower appliqué can be used to decorate all kinds of items, including:
Blankets and afghans
Market bags and tote bags
Hats and headbands
Garments and cardigans
Pillow covers
Wall hangings and home décor
Skill Level
This is an intermediate-level crochet pattern suitable for crocheters who have mastered basic stitches and are familiar with or are comfortable learning the following stitch techniques:
Beginning with an adjustable ring (double magic ring)
Joining with standing stitches
Ending a round with an invisible join
Crocheting into the back bars of a chain
Working stitches of varying heights
Clear instructions will guide you through each step so you can build confidence while creating a beautifully textured crochet flower.
Concentration Level
Fair amount of focus required. Involved stitch pattern and shaping may require fairly constant concentration.
Please do not copy this pattern to other websites. Instead, link to this page.
👇 Pin this pattern to crochet it later.
Columbine Crochet Pattern
Pattern Copyright © 2026 Jennifer Olivarez. Please do not reproduce or distribute this pattern.
Technical Editing: Randy Cavaliere
Pattern Testing: Amanda, Anjali, Barb, Beth, crochet-tm, DivaVonPurl, Heather, JO444, May, Michael, Nita, and Rachel
Written in standard US crochet terms. For UK terminology equivalents, please refer to the Craft Yarn Council’s conversion chart.
Finished Measurements
5 inches (12.5 cm) at widest points
Materials
Cascade Yarns Cascade 220 Superwash Sport (light) weight wool yarn (136.5 yds/125 m; 1.75 oz/50 g per hank):
Yarn for One Applique
#820 lemon (light yellow): 3 yds (3 m/1 g)
#269 mulberry purple (dark purple): 3 yds (3 m/1 g)
#844 periwinkle: 14 yds (13 m/5 g)
#817 ecru (white): 5 yds (4.5 m/2 g)
Size F/5/3.75mm crochet hook or size needed to obtain gauge
Locking stitch marker
Yarn needle
Yarn Note
Pattern is designed for light-weight yarn. Lighter or heavier weight yarns may be used. A different weight yarn may require a different size hook, as well as more or less yarn than noted. Working with a thinner or thicker yarn may result in different gauge measurements, which will affect the Finished Measurements.
Gauge
Rnds 1–4 = 2 inches (5 cm) in diameter
Pattern Notes
Join with slip stitch as indicated unless otherwise stated.
Chain-3 at beginning of round counts as first double crochet unless otherwise stated.
Special Stitches
Single crochet join (sc join): Place slip knot on hook, insert hook in indicated sp, yo, pull up a lp, yo, draw through both lps on hook.
Double crochet join (dc join): Place slip knot on hook, yo, insert hook in indicated st, yo, pull up a lp, [yo, draw through 2 lps] twice.
Special Techniques
Adjustable ring: Wrap tail end around forefinger clockwise 3 times. Insert hook under first 2 strands. Grab 3rd strand with hook and pull it under first 2 strands. Yo with working yarn and draw through lp on hook. Holding ch just made, slip ring off your fingers. Work sts of first rnd in ring, working over both strands. After first rnd of sts is worked, pull back lp to close front lp, then pull tail to close remaining lp.
Need help getting started? See the step-by-step Adjustable Ring Photo Tutorial here.
Invisible join: After working last st of rnd, cut yarn and pull working end through top of last st made. Thread tail onto yarn needle. Skip first st of rnd and insert needle from front to back through both top lps of next st. Pull yarn through gently but firmly. Insert needle down into back lp only of last st of rnd and pull it out toward back of work. Weave in end as normal.
Abbreviations (US Terms)
beg begin/begins/beginning
ch(s) chain(s)
ch sp(s) chain space(s)
cm centimeter(s)
dc double crochet (singular/plural)
g gram(s)
hdc half double crochet
lp(s) loop(s)
m meter(s)
mm millimeter(s)
oz ounce(s)
rem remain/remains/remaining
rep(s) repeat(s)
rnd(s) round(s)
RS right side
sc single crochet (singular/plural)
sl st(s) slip stitch(es)
sp(s) space(s)/spaced
st(s) stitch(es)
tr treble crochet
yd(s) yard(s)
yo yarn over
( ) work directions in parentheses in indicated stitch or space
* repeat directions following asterisks as indicated
[ ] repeat directions in brackets and braces as indicated
Pattern Instructions
Rnd 1 (RS): With light yellow, make an adjustable ring(see Special Techniques), ch 1, 5 sc in ring, close ring, join (see Pattern Notes) in first sc. (5 sc)
Rnd 2: Ch 1, sc in same st as join, (ch 3, sc) in each sc around, ch 3, join in first sc, fasten off. (5 sc, 5 ch-3 sps)
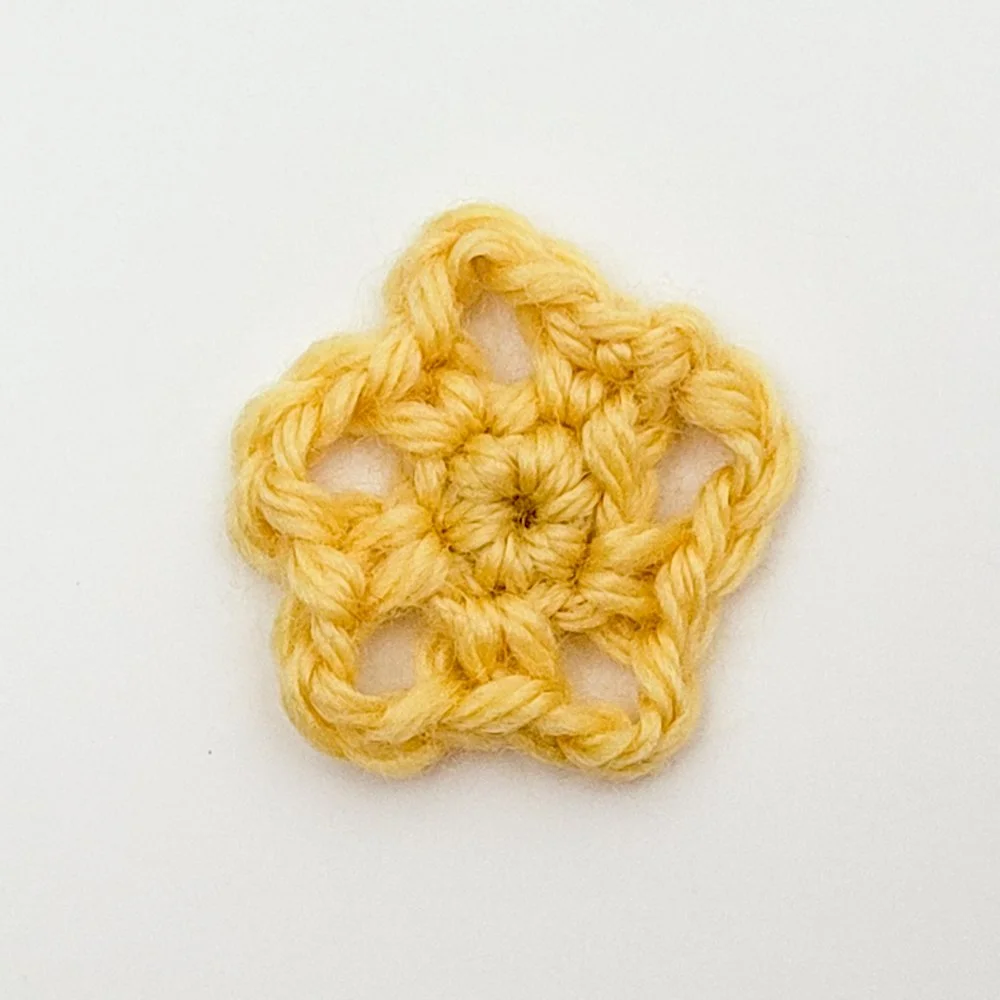
Rnd 2 complete.
Rnd 3: Join dark purple in any ch-3 sp, (ch 3, 3 dc, ch 3, sl st) in same sp, (sl st, ch 3, 3 dc, ch 3, sl st—petal made) in each ch-3 sp around, join in beg join, fasten off. (5 petals)
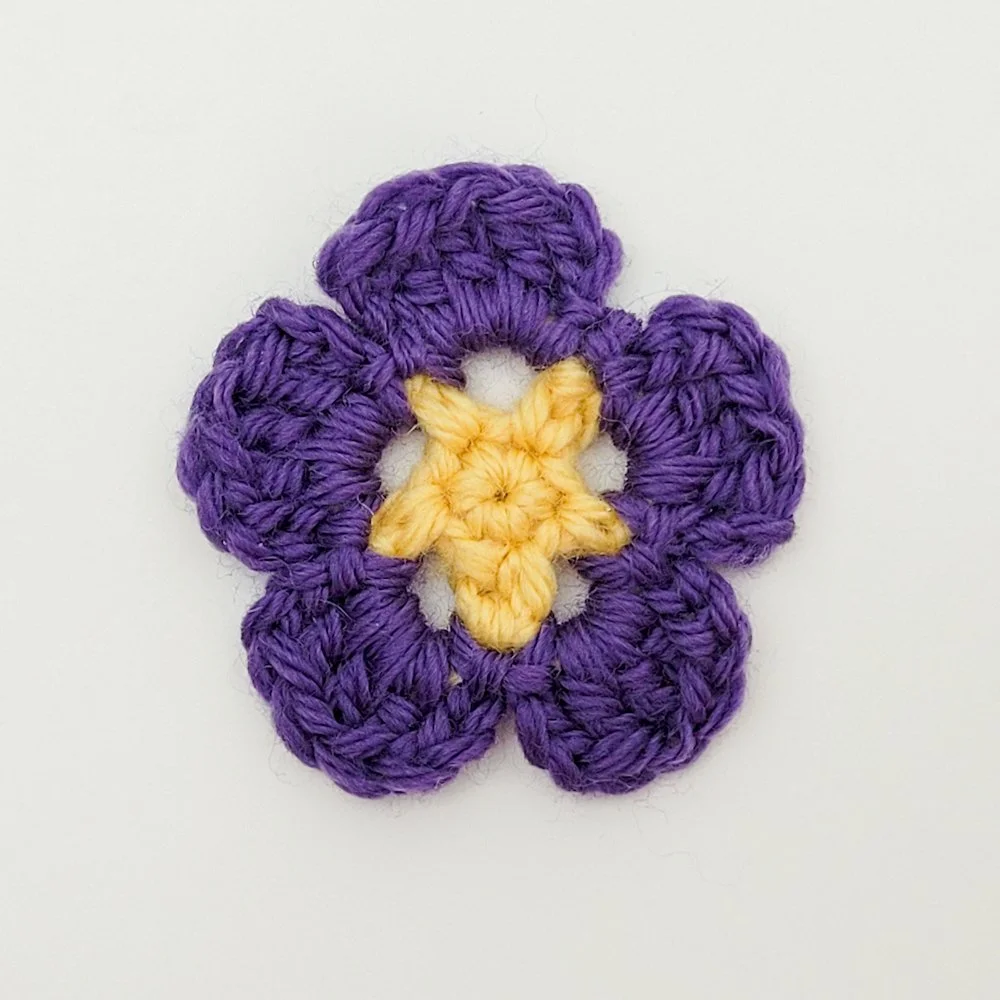
Rnd 3 complete.
Rnd 4: Sc join(see Special Stitches) periwinkle in first dc of any petal, [2 sc in next dc, sc in next dc, ch 3*, sc in first dc of next petal] around, ending last rep at *, join in first sc, do not fasten off, remove hook and place lp on marker. (20 sc, 5 ch-3 sps)
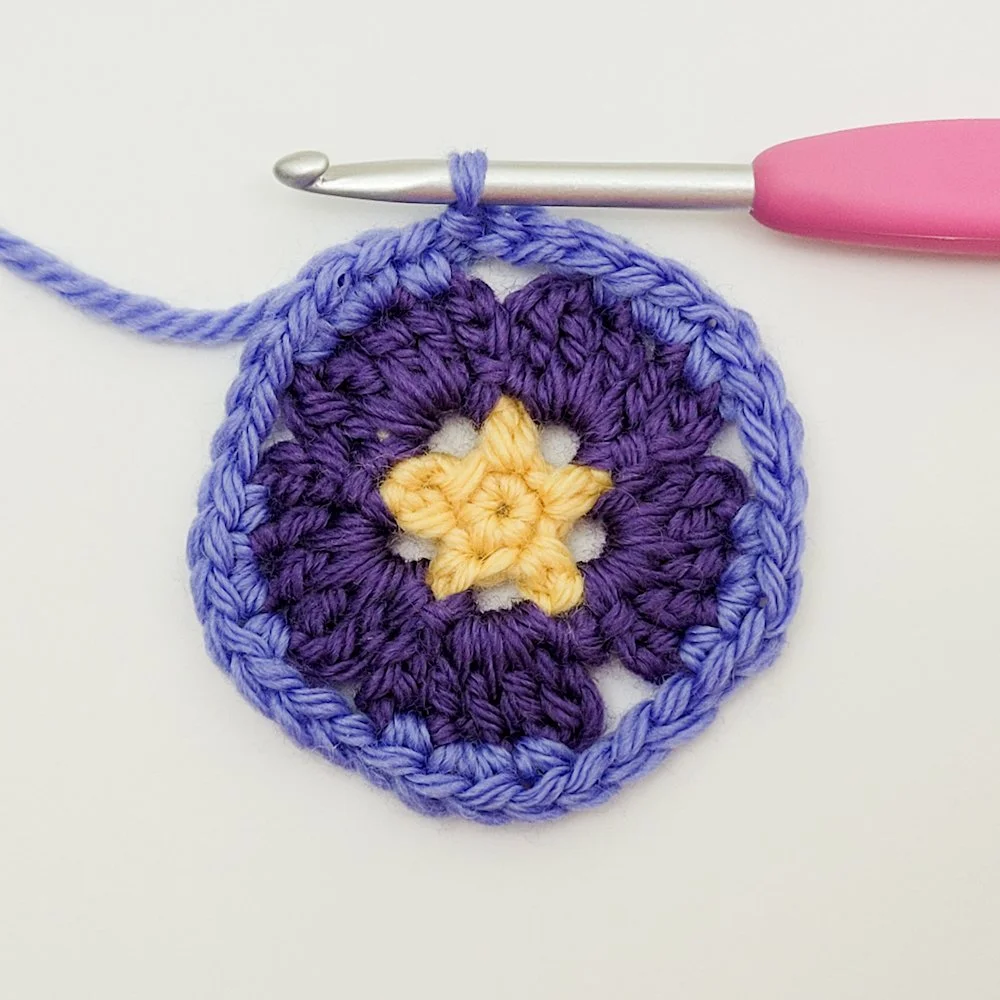
Rnd 4 complete.
At the end of Rnd 4, remove hook and place lp on a stitch marker (not shown). You’ll pick up this lp again when you begin Rnd 6.
Rnd 5: Holding lp on marker to back of work, dc join (see Special Stitches) white in first sc, dc in same sc, [2 tr in next 2 sc, 2 dc in next sc, working in front of next ch-3 sp, (hdc, 2 sc) in next ch-3 sp 2 rnds below, sl st in 1st sl st of next petal 2 rnds below, (2 sc, hdc) in next ch-3 sp 2 rnds below*, 2 dc in next sc] around, ending last rep at *, invisible join in first dc (see Special Techniques). (20 sc, 10 hdc, 20 dc, 20 tr)
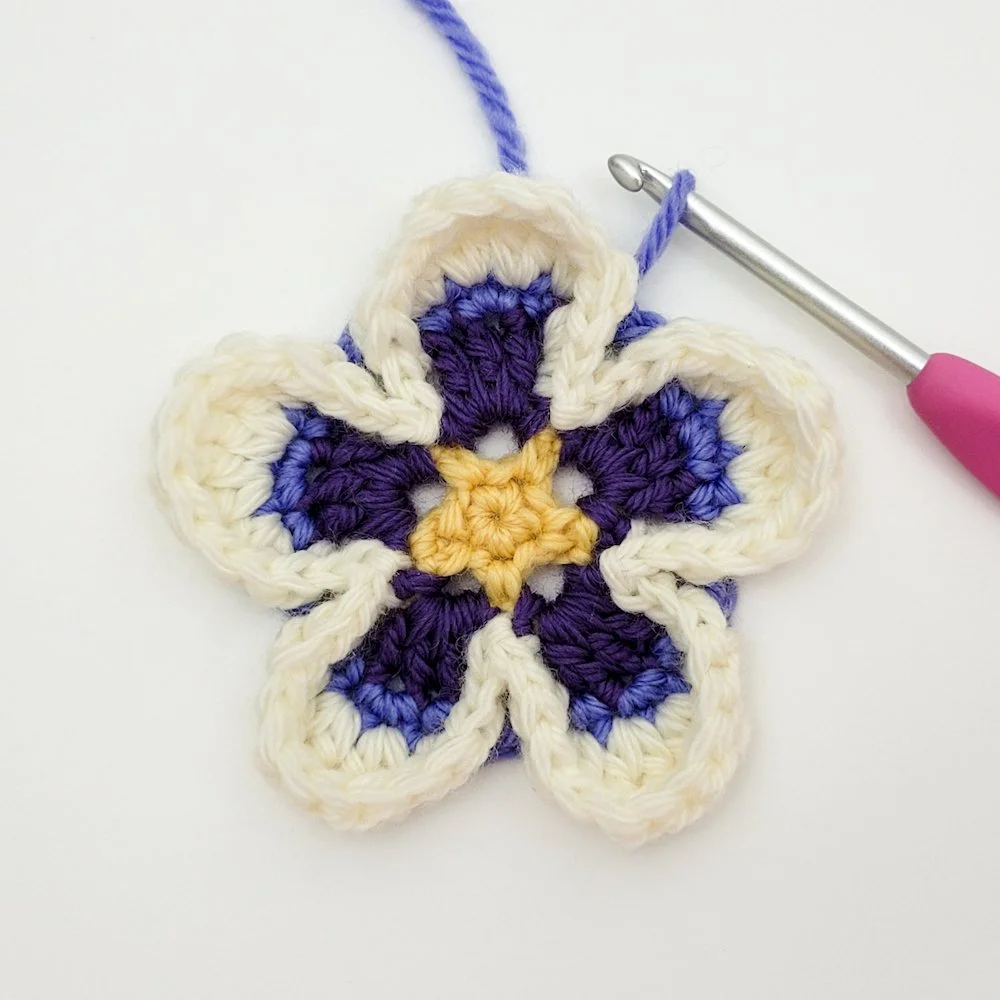
Rnd 5 complete.
Need help visualizing the stitch placement in this round? See the Round 5 Reference Photo below.
Rnd 6: Return lp of periwinkle to hook, [ch 5, working in next ch-3 sp 2 rnds below, (sc, ch 8, working in back bar of chs, sc in 2nd ch from hook and next 6 chs, sc)] around, join in first ch of beg ch-5. (5 petal rays, 10 sc, 5 ch-5 sps)
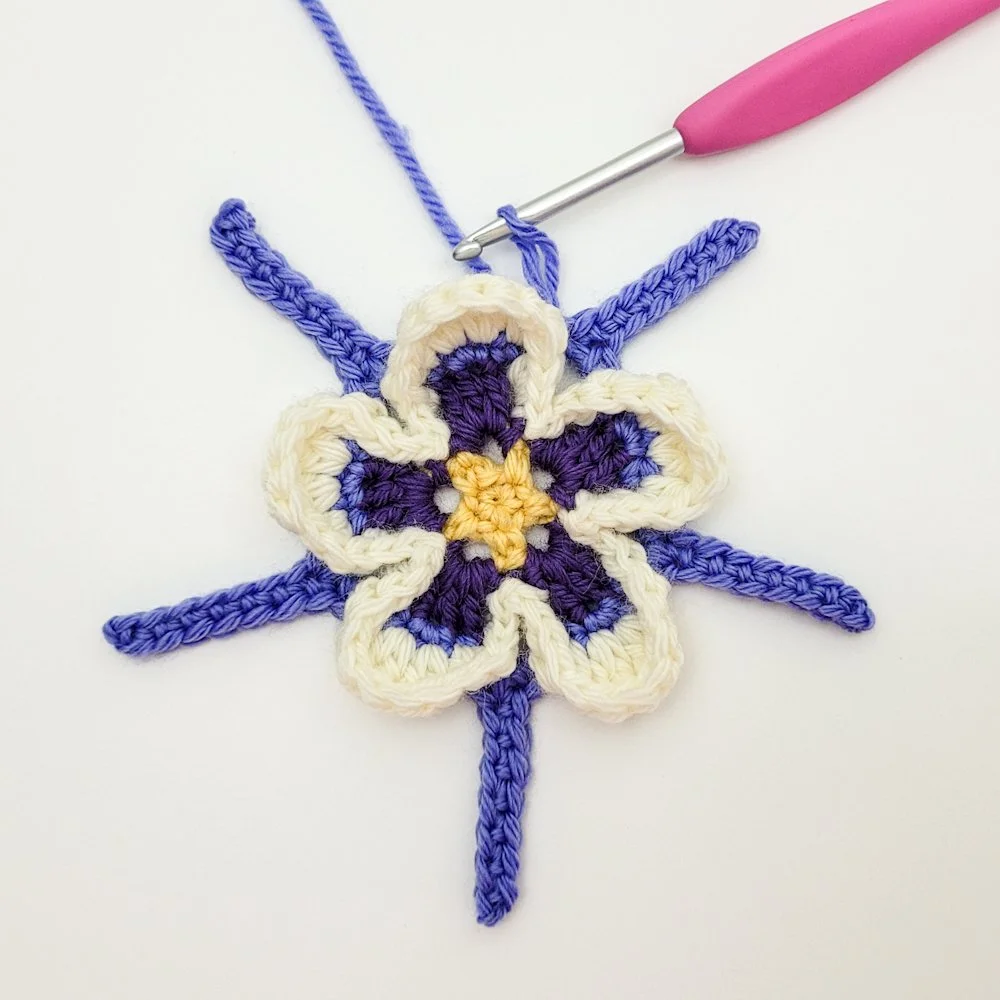
Rnd 6 complete.
Want to see where to work the petal rays in this round? See the Round 6 Reference Photo below.
Rnd 7: Sl st in next 2 chs, ch 1, sc in same sp, [tr in next sc, working in unworked lps of chs going up the side of next petal ray, 2 tr in first ch, tr in next ch, dc in next 2 chs, hdc in next ch, sc in last 2 chs, ch 3, continuing down opposite side of same petal ray, sc in next 2 sc, hdc in next sc, dc in next 2 sc, tr in next sc, 2 tr in next sc, tr in next sc*, sc in next ch-5 sp] around, ending last rep at *, join in first sc, fasten off. (5 large petals)
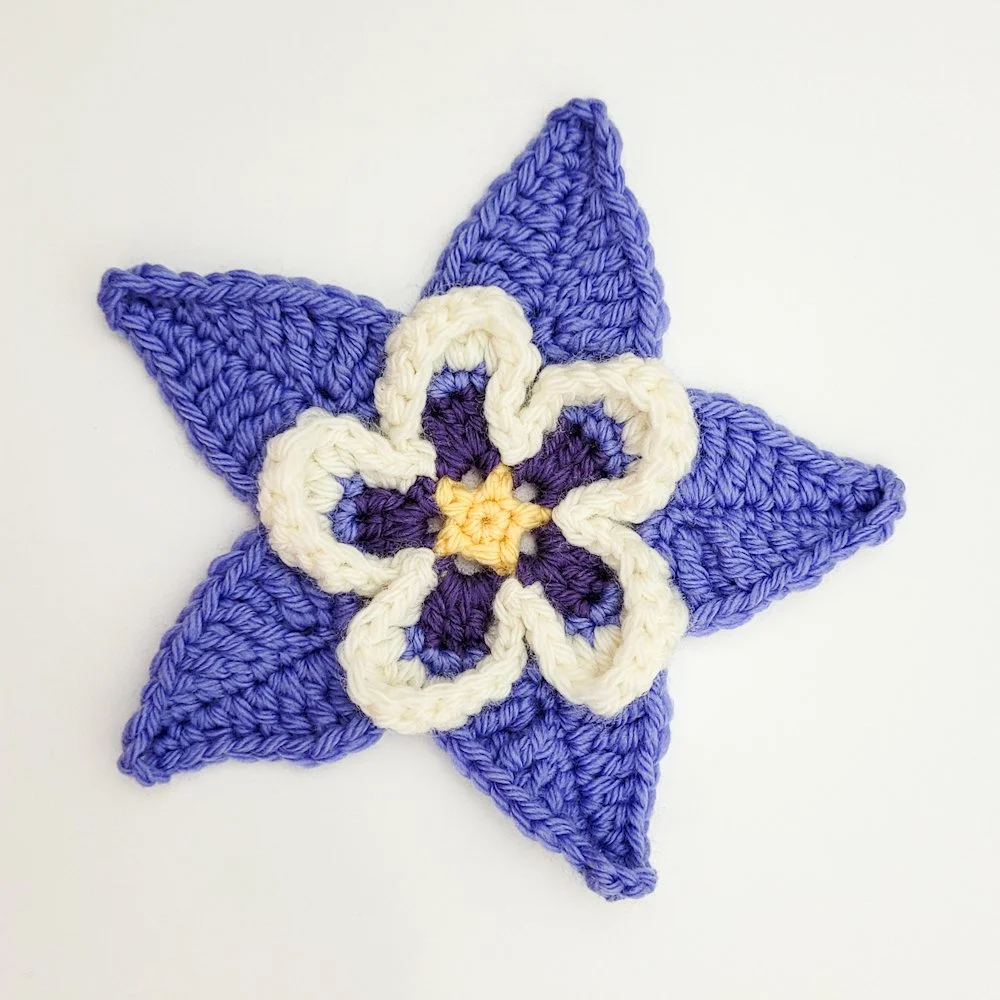
Rnd 7 complete.
Curious how the petals are made? See the Round 7 Reference Photos below.
Finishing
Weave in ends and block to finished measurements.
Reference Photos
Rnd 5: Stitch Placement Between Petals
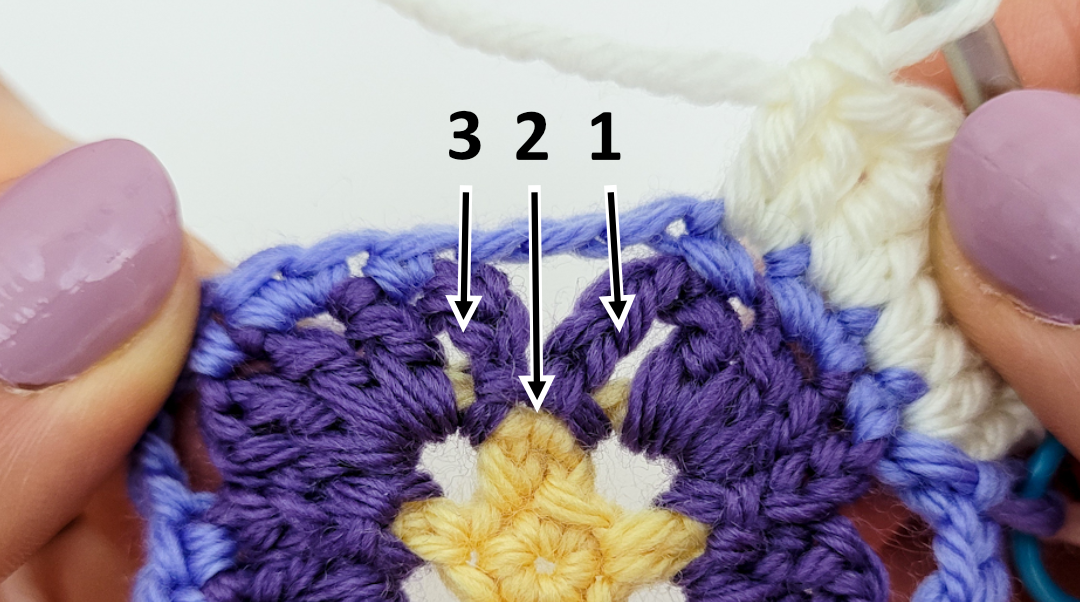
Rnd 5: Working in front of next ch-3 sp: (1) (hdc, 2 sc) in next ch-3 sp 2 rnds below; (2) sl st in 2nd sl st of petal 2 rnds below; (3) (2 sc, hdc) in next ch-3 sp 2 rnds below.
Rnd 6: Placement of Each Petal Ray
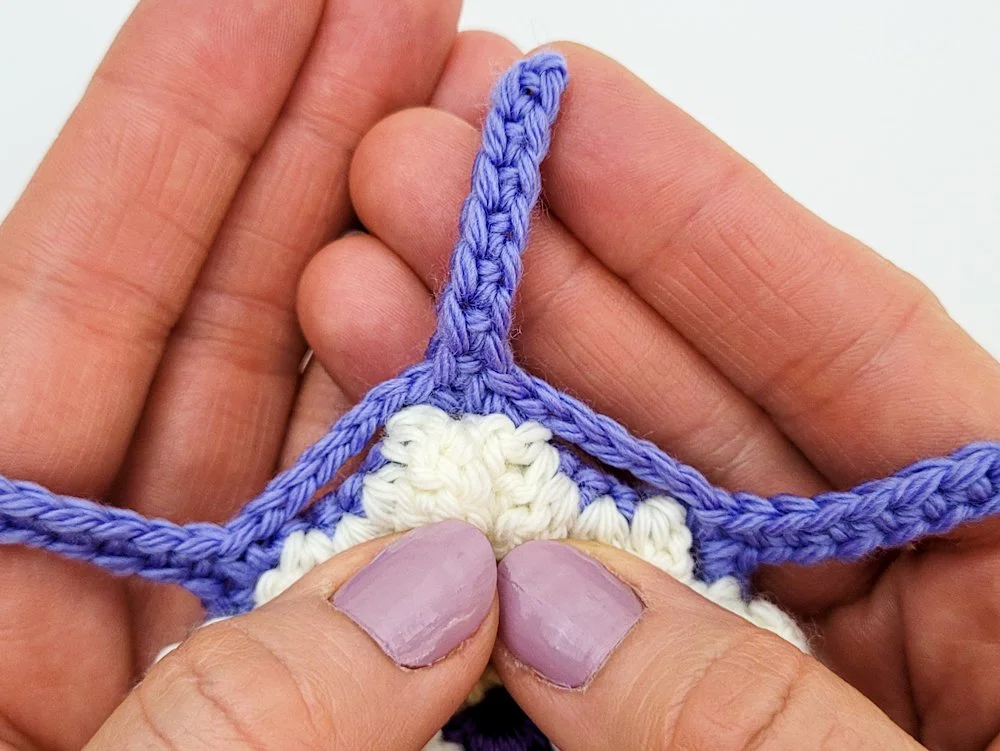
Rnd 6: Each petal ray is worked in a ch-3 sp of Rnd 4.
Rnd 7: Making the Large Petals
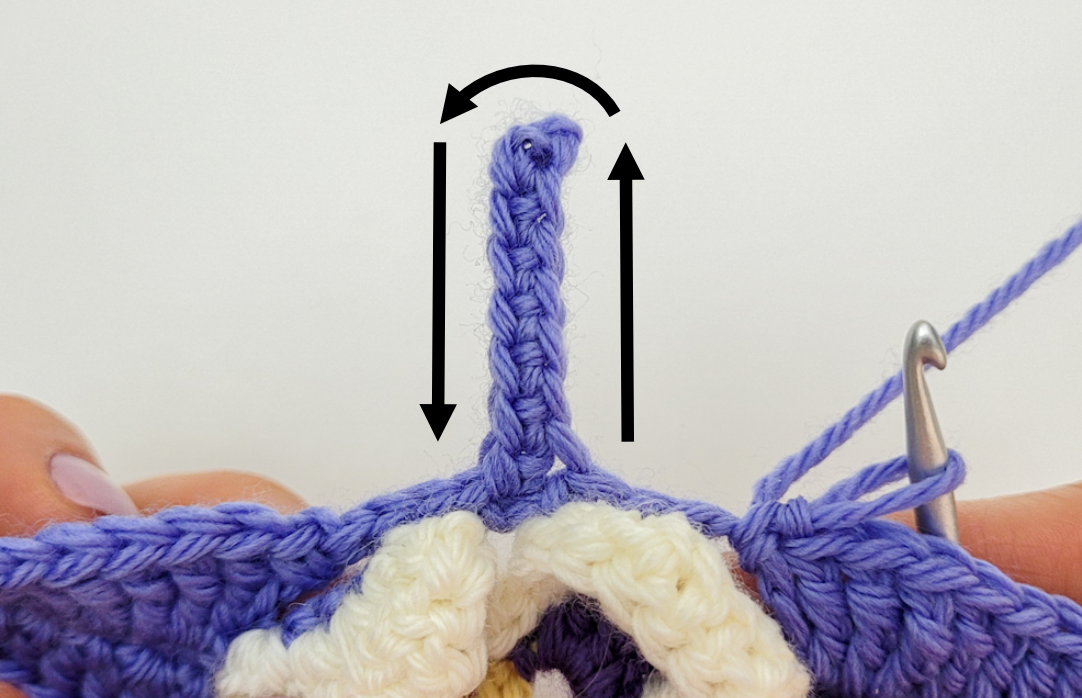
Rnd 7: Arrows showing direction of work for each large petal: work in free lps of chs up one side of next petal ray, then into sts on the opposite side.
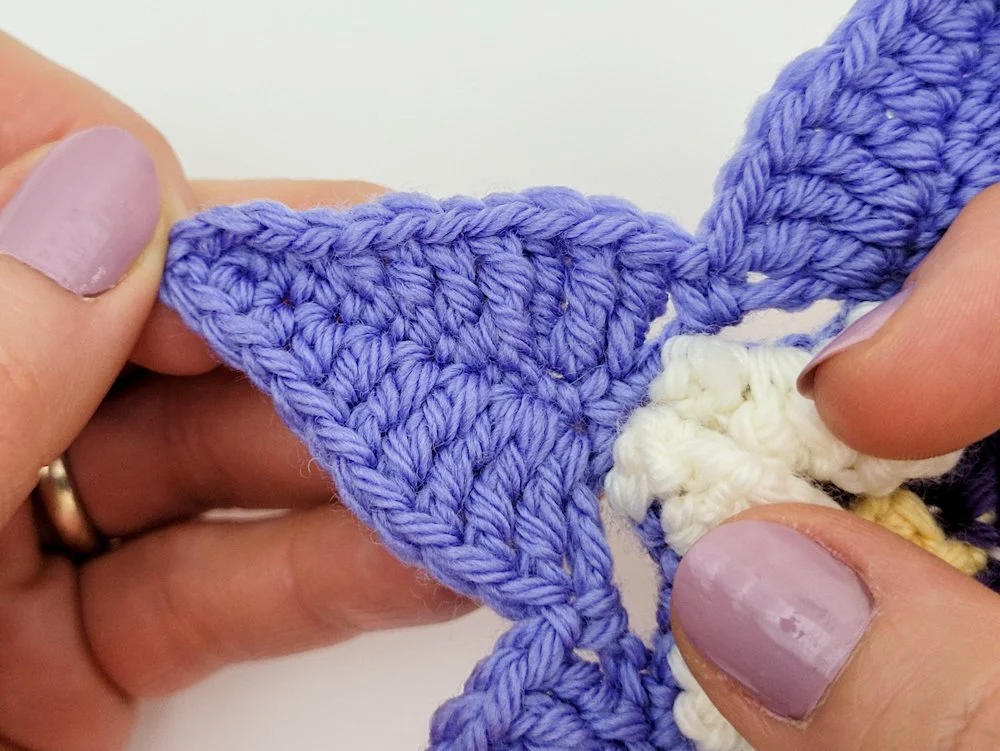
Rnd 7: Closeup of large petal complete.
Video Tutorial
Prefer to follow along visually? Watch the step-by-step tutorial.
Copyright © 2026 Jennifer Olivarez. All rights reserved.
This pattern is protected by copyright and may not be reproduced, redistributed, or transmitted in any form or by any means, including print or digital, without the express written permission of the designer.
You may share a link to this pattern on websites or social media, but please do not copy or repost the pattern content.
Finished items made using this pattern may be sold in limited quantities, provided that credit for the design is given to Jennifer Olivarez.
Please use the contact form for questions and pattern support.